
Introduction to this series
Given the recent discussions happening around Paket, I’ve been asked (or seen questions asked) recently regarding getting up and running with Paket. So, I thought I’d do a short series of posts that covers the “what” and “why” of Paket, followed by the “how” (the “when” is easy – always 😉 )
The series will be in at least three parts – in this post, I’ll deal with basic value proposition of Paket and create a Hello World solution. In the next post, I’ll illustrate how to perform a basic migration from an existing NuGet solution and offer some basic tips for doing it. In the third post, I’ll take a more complex project and we’ll see how to resolve migration issues that appear due to invalid dependencies (more on this in that post!).
This article won’t explain all of the benefits of Paket, but is intended to show you the basics of the tool and provide an overview of the core features. I suggest you read up more on the Paket site and look at the FAQs here if you want to know more.
What is Paket?
Paket, at its most basic, is a fully open-source, drop-in replacement for the NuGet client tool. It’s designed to perform the same overall goal as the NuGet client that comes bundled with Visual Studio – managing NuGet dependencies sourced from NuGet servers. It works with the same NuGet packages, from the same sources, on both “full-fat” .NET and Dotnet Core.
Paket is a mature project now, at almost three years old, with thousands of OSS projects using it, as well as being used internally by private organisations. It has a large number of contributors (200 different individuals at the current time) and a rapid release cycle – it’s not unusual for there to be intraday releases with new features or fixes.
There’s a common misconception that Paket is an F#-only tool, but this is wrong: Paket is written in F#, but the tool itself works equally well across projects for C#, VB .NET and F# projects.
Why Paket?
Paket’s main benefits over the NuGet Client are:
- A powerful resolver means that Paket will protect you from accidentally creating incompatible dependency chains – something that can often occur with the NuGet, particularly across multi-project solutions.
- Extremely quick, with a very simple workflow for common situations.
- Allows fine-grained control of package dependencies when needed – whilst the defaults are extremely simple, you can be extremely particular about what versions of dependencies you want.
- Supports file dependencies straight from GitHub (or any other HTTP resource). In other words, you can have a dependency on a given file from a specific commit on GitHub. For example, you could have a dependency on the SqlMapper.cs in the Dapper project, instead of downloading a whole NuGet package. Or you could share a single cs file across multiple solutions without the need to have a private NuGet server to share them. Paket will add the file to your project as a linked, read-only file as needed.
Dependency Strategies
Before we get into the fun stuff, let’s just do a quick comparison of how the NuGet and Paket clients manage NuGet dependencies.
Dependencies in the NuGet world
The conventional NuGet view is something that you probably already know pretty well. Each project has an associated packages.config file, which contains all of the NuGet packages required for that project.
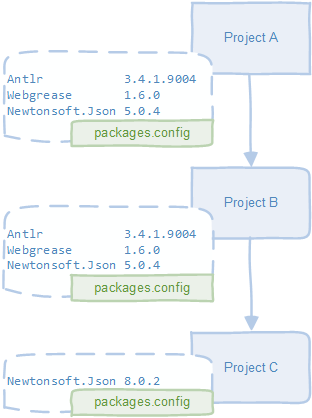
In this case, Projects A and B have pulled down the WebGrease package and associated dependencies, whilst Project C has a single dependency on Newtonsoft.Json. Also, Project A references B, which in turn references C. Pretty simple to understand, but there are some interesting things to note:
- By default, NuGet will check out the lowest version of transitive dependencies (i.e. the “child” dependencies for the dependency that you asked for). In our diagram, we pulled down WebGrease, and implicitly got Newtonsoft.Json 5.0.4, because that’s the lowest version that WebGrease needs. You’ve almost certainly been in this situation before, where you’ve pulled down a NuGet dependency, and then immediately had to update some of the child packages that came along for the ride – this is why.
- From the packages.config file, there’s no way to know if there’s any relationship between those dependencies, or which one you as a developer really care about – everything is just a flat list of dependencies per packages.config file.
- Notice that all of the projects have a dependency on Newtonsoft.Json, but Project C has a different version to A and B. This is perfectly legal in NuGet terms, but the behaviour will be unpredictable, since there’s no way to be 100% sure what version will be deployed at runtime; moreover, if there’s a breaking change e.g. a method has been removed, you’ll only know about this at runtime, if and when you try to call that method. How often have you had a large solution and after a few weeks realised that your dependencies are out of sync, but been too scared to “fix” them? Note: The VS GUI tooling for NuGet in VS2015 onwards has a nice “consolidate” option to “fix up” mismatched dependencies. This might work fine for you, but you (a) have to be aware of this, and manually check this on a regular basis to fix things up, and (b) it only works in Visual Studio on Windows.
A word on .NET Core
In the MSBuild 15 csproj world, NuGet can specify top-level dependencies directly in the csproj as nodes, and you can do away with the packages.config file completely. You also don’t have to specify transitives at all – NuGet will figure them out for you. Unfortunately, this introduces a new problem – since NuGet doesn’t record the versions of your transitive dependencies, you can’t be sure that you’ll always get the same versions across builds and / or machines. For example, it’s possible to get one version of a transitive dependency on your machine, and a different version when your CI server runs.
Whilst we’re at it – Paket has very good support for .NET Core. In fact, with the help of the .NET Core team, Paket now hooks seamlessly into .NET CLI tooling, so commands such as dotnet restore simply call Paket behind the scenes.
Paket Dependencies
Paket works a little differently to NuGet. Instead of one file per project, paket has three different types of file, all of which get committed into source control:
- paket.dependencies – where you tell Paket what you want. It’s a simple solution-wide, user-modified list of your top-level dependencies in a single file. This is a major difference from the NuGet model, where each project has it’s own “view” of dependencies.
- paket.lock – where Paket tells you what you need. It’s a solution-wide view of all dependencies, including transitive dependencies and associated constraints, in a single file. It’s re-calculated whenever you modify the dependencies file, and provides paket with an understanding of the relationship of all the dependencies as a single logical graph that is known to be valid in terms of package constraints. You never modify this file yourself – it’s controlled exclusively by paket, although it’s designed to be human-readable.
- paket.references – a user-modified file per-project that tells paket which top-level packages your cs/fs/vb project is dependent on.
Versioning and committing the lock file into source control is very important, because it means that everyone can guarantee that they will get the same set of dependencies for any given commit of code. Here’s the equivalent of the original dependency set, but in Paket terms. Green files are ones that you edit; red ones are managed by paket itself.
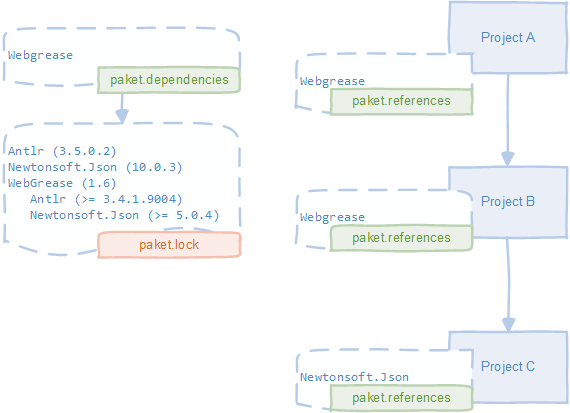
In other words:
- You tell Paket that you want WebGrease.
- Paket tells you that you’ll need WebGrease plus both Antlr and Newtonsoft.Json.
- You then tie up your packages to specific projects
What are the benefits of this approach?
- The paket.dependencies file contains our set of top-level dependencies across the whole solution. We can clearly see that there’s only one here – WebGrease; the rest are just transitive dependencies that are along for the ride (interestingly, this is something we couldn’t see in the packages.config file).
- The nature of the paket.lock file means that your dependencies cannot drift across projects, since there’s only one version per dependency. Note: There’s a paket feature called groups that allows you to override this. However, it’s an explicit opt-in feature, and not the default.
- Also notice that Paket defaults to retrieving the newest version of transitive dependencies. For example in the lock file, Paket understands that WebGrease has a dependency on at least Newtonsoft.Json 5.0.4 (indicated by the indented entries underneath WebGrease), yet it pulled down version 10.0.3, which is the latest version available.
- Lastly, you can see that we only needed to specify WebGrease in the references file, and not the transitives; Paket will do the hard work of figuring all that out for us and automatically add references to all of them for us.
Hello World with Paket
With that in mind, let’s get going with a “hello world” of Paket.
Paket Tooling
The first thing to know is that paket is primarily a command-line tool. However, there are tooling options out there that wrap around the executable:
- The VS Code Ionide Paket plugin (highly, highly recommended)
- The Visual Studio extension
- A PowerShell module
Unlike NuGet, the tooling is not a “core” part of the project. So, don’t expect a fancy search function that shows version history or a graphical representation of your dependencies. Both IDE plugins delegate down to the command line, so anything you do in the GUI, you can do on the command line (but not necessarily the other way around!).
I’ll be using VS Code in this series, but you can achieve the same functionality through the other methods. If you want to use the command line (always a good option, particularly for educational purposes), see here. Even though I use Visual Studio for day-to-day development, I usually still have VS Code open for paket commands. That being said, the Visual Studio extension, whilst not as powerful as the VS Code one, does have a package search dialog and is pretty easy to use.
Paket Commands
I’ve created a standard Visual Studio 2015 solution that contains one C# project (ConsoleApp), and one F# project (MathsAndScience); the first projet references the second.
The first thing we need to do is “initialise” paket on the project. You can do this from the command line with the paket init command once you’ve downloaded Paket from the website, but much easier is to run the same command from VS Code:

This will download three files for us:
- .paket\paket.exe – the Paket application, equivalent to NuGet.exe
- .paket\paket.targets – an MSBuild target that allows csproj files to automatically restore NuGet dependencies
- paket.dependencies – an empty dependencies file
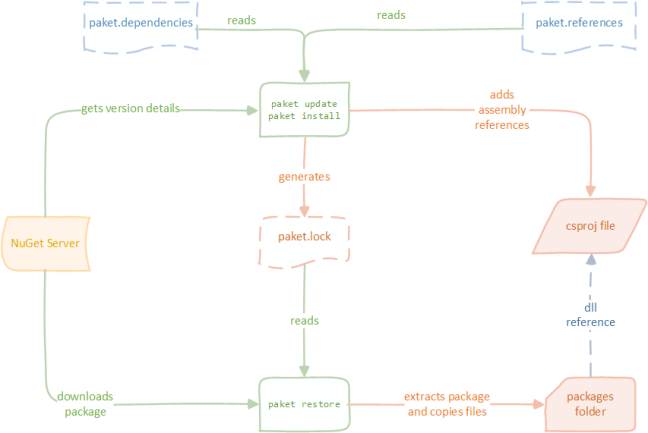
Before we go any further, let’s define some important commands in Paket:
- Install – Install does two things. Firstly, it modifies csproj files so they’re in sync with paket.references files (when you add or remove a dependency to a project). Also, it keeps the lock and dependencies files in sync. So, if you add or remove a dependency, paket will contact the NuGet server to get version information on the changed packages and update the lock file accordingly.
- Update – Update is a more drastic version of Install. It does the same thing, except it updates the entire dependency graph, rather than just sections affected by new or removed dependencies.
- Restore – Restore simply downloads the NuGet packages as specified in the lock file. No recalculation of the graph is done, and no modification of project files is performed. Call this as part of your build or CI process in order to download the packages to the machine before a compile.
This simplified diagram shows the basic flow. Again, red boxes represent entries that are owned by paket; blue boxes represents files controlled by the user.
Update and Install somewhat overlap in terms of functionality, but in general, use this rule of thumb:
- if you have changed the dependency file or a references file, use install
- If you haven’t changed any files, and simply want to “update” to the latest versions of your packages, use update
In addition to extra parameters to customise these commands, Paket also has many other commands; often they are simply wrappers or extensions around these three.
Adding our first dependency
Armed with that knowledge, let’s add WebGrease to the C# project. If you’re following along, commit your project structure into git at this point, so you can reset if you want to experiment.
- Add a new line to the paket.dependencies file: nuget WebGrease. Notice that we haven’t specifed a version – we’ll let Paket get the latest for us (Note: Paket has rich support for version constraints if required)
- To avoid Paket having to download the entire universe, and since we’re just using “full” net45 here, add a second line to the dependencies file: framework: auto-detect. This tells Paket to only download packages suitable for TFMs used by any associated .net project files.
- Create a new file into the ConsoleApp project folder, called paket.references. There’s no need to add the file to the csproj – paket operates completely standalone from projects and solutions.
- Add a single line into the file – just the word webgrease.
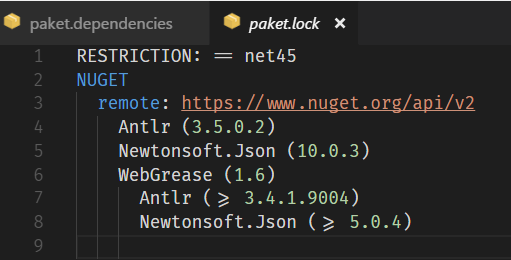
- Run paket install. Remember that since paket automatically checks if the lock and dependencies file are out of sync (which they now are), it will automatically generate a lock file for us, before calling restore and updating the csproj file.
Hey presto! Your C# project now has the latest version of the webgrease project, and all child dependencies, added to it. The lock file should look something like this:
Notice that there was no custom GUI tooling as such to add a package. You simply typed the name of the dependency into a plain text file and called a command. Incredible, eh!
Note: you could have also done this without doing step 3. In this case, Paket would have downloaded the packages etc., but simply not added the references to the project. You could have then added the references file afterwards, and re-run install to update the csproj.
Package Paths
One thing to note is that unlike NuGet, Paket doesn’t put the version number into the names of package folders in packages/. For example, here’s the packages folder for the F# Azure Storage Type Provider:
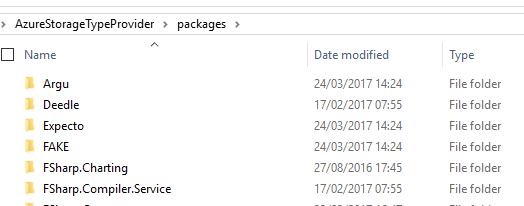
Notice that there are no version numbers in the folders. This gives two benefits: Firstly, when we update packages, there’s no need to update the csproj file, because the paths to the dlls is unchanged. Secondly, this works great with script files such as .fsx or .csx, as once again references to dlls will be unaffected by newer versions of packages.
Adding further dependencies
You can now follow the same approach for the second project, MathsAndScience. In this case, just create the references file with the entry for Newtonsoft.Json, and call paket install. This time, we won’t need to add anything to the dependencies file, since Newtonsoft.Json has already been pulled down as part of WebGrease.
Note: There’s also a custom command called paket add – a streamlined version of the operations you just did, with good support for this in VS Code. You might want to try that out!
That’s it. You’ve now got your dependencies added to both projects. That wasn’t so hard, was it?
Conclusion
In this post, I explained the key differences between NuGet and Paket, and demonstrated the most important command that you use in Paket, install. I also explained a few other commands, such as restore and update.
This has only really touched the surface of Paket – there’s a whole lot more it can do, and I’d encourage you to experiment with it using the excellent on-line documentation for guidance.
In the next post in this series, I’ll perform a simple migration from an existing NuGet solution to Paket. See you then.

Thanks for explaining the distinction between install and update. I’ve been using Paket for nearly 2 years and always thought install was just for original installation or re-installing.
Looking forward to more installments in this series.